A Comprehensive Guide to Using the LMesh Gateway for IoT Prototyping
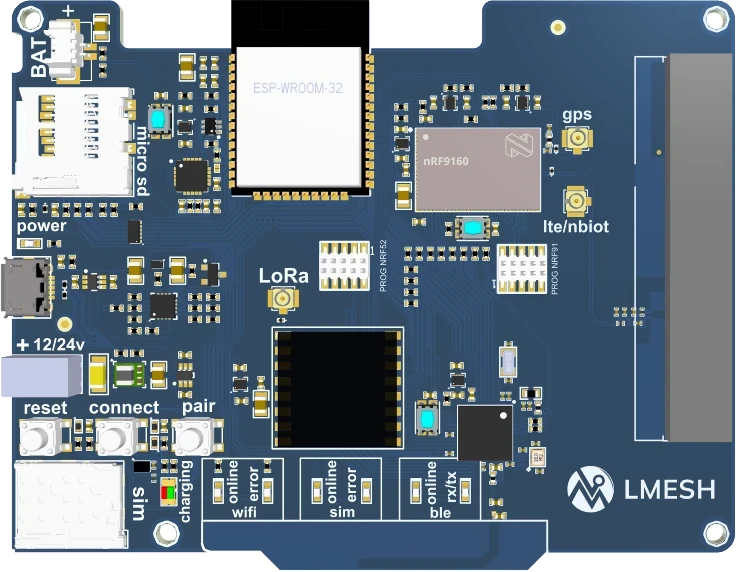
The LMesh Gateway is one of the most popular products, which is a complete development board designed to simplify IoT prototyping and help developers and engineers connect and build reliable and secure IoT projects efficiently with a single device that combines many wireless protocols, eliminating the need for separate hardware components, and allowing users to focus on their projects instead of troubleshooting different connectivity parts.
In this comprehensive tutorial, we will explore the key features and benefits of the LMesh Gateway and provide step-by-step instructions on how to use it for IoT prototyping.
The Idea Behind LMesh Gateway
LMesh Gateway serves as a bridge between IoT devices and the cloud. It facilitates communication between sensors and IoT devices using RF protocols such as Wi-Fi, BLE, LoRaWAN, and Celluar. In addition, it has GNSS (Global Navigation Satellite System) functionality, allowing devices connected to the gateway to utilize location data in their applications and functions.

The LMesh Gateway framework is highly customizable and supports multiple programming languages and SDKs. You can easily integrate it with various cloud platforms such as AWS, Azure, nRF Cloud, and LMesh IoT Cloud. Additionally, the LMesh Gateway supports different platforms like Arduino IDE and Zephyr RTOS.
Firstly, you have to choose the microchip that will be programmed using the headers on the PCB and USB plug, where The LMesh Gateway has three microcontrollers:
nRF9160: Low power SiP with integrated LTE-M/NB-IoT modem and GNSS.
nRF52840: supporting Bluetooth Low Energy, Bluetooth mesh, NFC, Thread and Zigbee.
ESP32: Hybrid Wi-Fi & Bluetooth Chip.

How to program the ESP32 Module on The LMesh Gateway using the Arduino IDE:
Step 1: Install the Arduino IDE
Download and install the Arduino IDE from the official Arduino website (https://www.arduino.cc/en/software).
Follow the installation instructions specific to your operating system.
Step 2: Install ESP32 board support
Open the Arduino IDE.
Go to "File" -> "Preferences".
In the "Additional Boards Manager URLs" field, enter the following URL:
https://raw.githubusercontent.com/espressif/arduino-esp32/gh-pages/package_esp32_
Click "OK" to save the preferences.

Go to "Tools" -> "Board" -> "Boards Manager".
In the Boards Manager, type "esp32" in the search bar.
Select "esp32 by Espressif Systems" and click the "Install" button.
Wait for the installation to complete.

Step 3: Connect the LMesh Gateway
Connect your ESP32 board to your computer using a USB cable.
Make sure the board is properly detected by your operating system.

Step 4: Select the ESP32 Board and Port
In the Arduino IDE go to "Tools" -> "Board" to select your ESP32 board from the list, for example, "ESP32 Dev Module". Then, go to "Tools" -> "Port" and select the appropriate serial port that corresponds to your ESP32 board.

Step 6: Write your Code
Now, The LMesh is ready to write your ESP32 code using the Arduino programming language. Once done, click on the "Upload" button to upload the code to the ESP32 board. Verify the upload by checking the "Upload finished" message in the status bar. Open the Serial Monitor to see the output from your ESP32.
Using the Arduino IDE is the simple way to program ESP32, however, if you require more advanced tools and SDKs, there are other options available such as:
ESP_IDF: Espressif IoT Development Framework, The Offical development framework for Espressif SoCs.
These alternatives will be covered in other articles.
How to program the nRF9160 & nRF52840 Modules on The LMesh Gateway using the ncs(nRF Connect SDK):
The nRF Connect SDK is a software development kit suitable for creating products based on Nordicsemi devices of nRF52, nRF53, nRF70, and nRF91 Series. It provides a flexible framework that allows developers to build software for memory-constrained devices that are optimized for size, as well as more complex software for advanced devices and applications. It integrates the Zephyr RTOS and a wide range of samples, application protocols, protocol stacks, libraries and hardware drivers.
To install the nRF Connect SDK and set up the necessary development environment, you can follow the instructions provided in the "nRF Connect SDK Fundamentals" course from Nordicsemi. This course guides you through the installation process and helps you configure your development board.
Writing and Flashing a Program for nRF9160 on the LMesh Gateway
In this tutorial, we will use an asset tracker v2 example which samples and sends sensor data to a connected cloud service over IP using LTE. To write and flash a program for the nRF9160 module on the LMesh Gateway, you can follow these steps:
Step 1: Open VS code
Open Visual Studio Code (VS Code) and navigate to the Welcome View of the nRF Connect Extension.
Step 2: Create a New Application
Click on "Create a new application" in the Welcome View. In the "Create New Application" window, type "asset tracker" in the search field. Select the "asset tracker v2" from the list of available samples. This sample application is suitable for our purpose and will serve as a starting point.
Step 3: Build the Asset Tracker Application for the LMesh Gateway
In this step, we will specify the target development board or custom board (hardware) we want to build the application. Since we are using the LMesh Gateway with the nRF9160 module, select "lmeshgateway_nrf9160" as the target board. Additionally, choose the appropriate software configuration (*.conf and possible overlays) to be used in the build process
Step 4: Flash the Program to the LMesh Gateway
To flash the program to the LMesh Gateway,
connect a link programmer or any nrf DK board with the debugger to the LMesh Gateway using the header. Once everything is set up, follow the instructions provided by the nRF Connect SDK to flash the program onto the nRF9160 module.

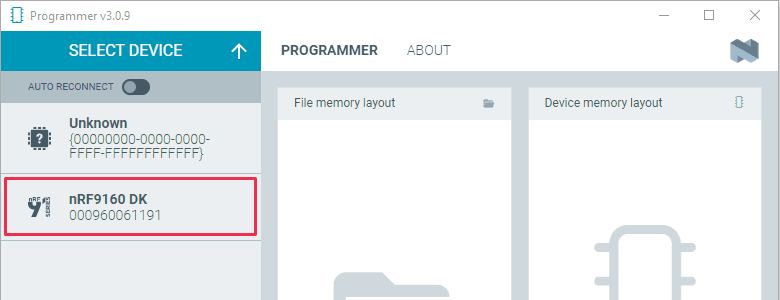
open the Programmer app on your computer.

Connect the LMesh Gateway to your computer using a micro-USB cable and turn it on.
In the Programmer app, select the nRF9160 from the drop-down list.
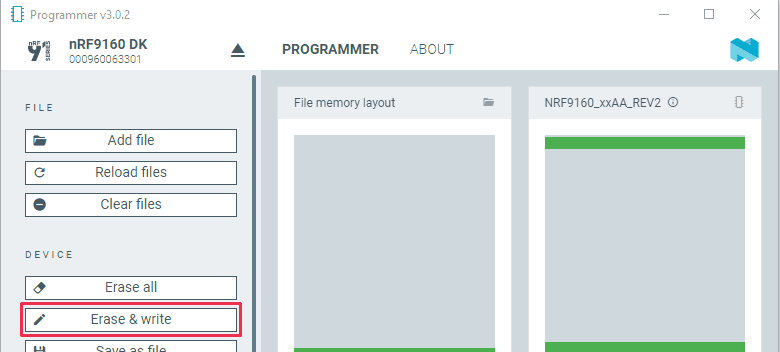
Click on "Add file" and navigate to the folder where your firmware file is located.
Select the .hex file for the application you want to update.

Click on the "Erase & write" button to start the firmware update process.
Wait for the update to complete. Do not disconnect or turn off the board during this process.
Once the update is finished, you can disconnect the LMesh Gateway from your computer.

Writing and Flashing a Program for nRF5284
To write and flash a program for the nRF52840, you can follow similar steps as mentioned above for the nRF9160. Here's a summary:
Open VS Code and navigate to the Welcome View of the nRF Connect Extension. Click on "Create a new application" and search for the desired sample application (e.g., asset tracker).
Choose the "lmeshgateway_nrf52840" as the target development board. Select the appropriate software configuration for the build.
Connect the nRF52840 module on the LMesh Gateway using the programming header
Follow the instructions provided by the nRF Connect SDK to flash the program onto the nRF52840 module.

By following these steps, you will be able to write and flash programs for both the nRF9160 and nRF52840 modules on the LMesh Gateway using the nRF Connect SDK.
Conclusion
The LMesh Gateway is a versatile and user-friendly platform that simplifies IoT prototyping and conceptual presentations. With its all-in-one capabilities, easy customization, and support for popular programming languages like Arduino IDE and Zephyr with Visual Studio Code, the LMesh Gateway empowers users to bring their IoT ideas to life quickly and efficiently.
Posted by
LMesh Team
Date:
Dec 15, 2023

